
This article will explain how to make your own negative pressure (vacuum) projection liner for geodesic domes, for a reasonable price and of professional quality. It is inspired by a patent filed more than 35 years ago.
Our example
First: in this example we are looking to produce a projection liner for a 15 meter (50-foot) diameter geodesic dome, the materials will be the same used by professional projection liner manufacturers. The main component of your liner is the vinyl:
- Because there is waste when cutting sections, let’s round the total to 400 linear yards of fire-retardant vinyl
- 2-layer projection liner 400 linear yards X $20 = $8,000 of vinyl material
Next is the frame holding up the projection liner.
The Frame
The other component to this projection liner is the frame to hold up the projection liner. Look at the images below:
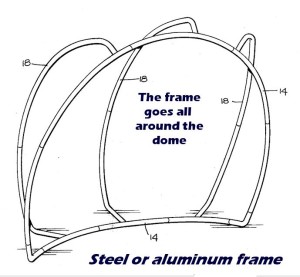
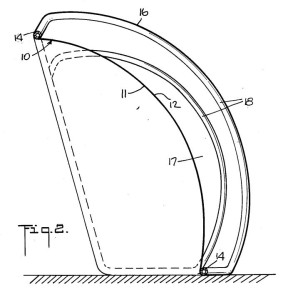
The frame is slightly smaller than the geodesic dome. Its sections slide one into the other, just like top rails on a fence or electrical or plumbing conduit. To curve the metal to mimic the shape of the dome, a little math is required, but basically almost any metal shop can bend the pipe, and quickly. The end result is an easy-to-assemble frame.
A fairly generous estimate for the cost of a frame to hold up the projection liner is approximately $5000. Actually it’s a high estimate and almost any pipe can be used since it will never show (it’s between the two vinyl layers.
How you end up with up a very nice projection surface
The principle is simple: the outer layer is sealed to the inner layer and the metal frame holds up both layers. Connector an air pump to an opening and turn it on to create a suction.
You need only one location to suck the air out evenly because the negative pressure (vacuum) will equalize itself all over.
IMPORTANT: if you use vinyl which weighs 16 oz per square yard, , this means your liner will weigh hundreds of pounds/kilograms. In our example, a single layer of vinyl is 4000 square feet, and we need two layers, for a total of 8000 square feet. At 18 ounces per square yard, the liner will weigh 900 pounds or more than 400 kilograms.
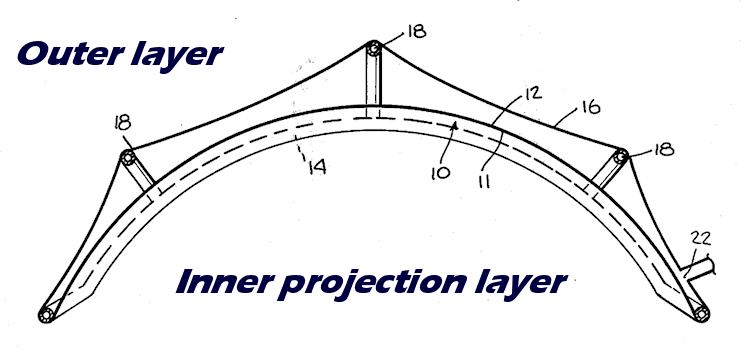
When air is suctioned out between the two layers, the inner layers forms a natural dome shape. An important note is how the frame is assembled, then the projection liner is thrown ovet the frame, and for a final touch, both layers are sealed at the the base.
Here is your current total (retail):
- $8000 for fabric
- $5000 for the frame
The next cost is making the 2 liner shapes.
You need to create two half spheres (like an umbrella). the bigger one for the outer layer, the smaller one for the interior layer, the one on which you project. Vinyl is heat welded. If you don’t know where to go, try truck tarp makers; they heat weld vinyl on a daily basis.
It should not take more than 3 days of work to assemble the sections together. But if you do not pre-cut the sections yourself, expect 4 days of shop work, 8 hours per day, $80/hour.
Your current total is now:
- $8000 for fabric
- $5000 for the frame
- $3000 for heat welding of vinyl sections (rounded higher)
Add the cost for a blower/ pump: $300. Your total is under $17,000
So, let’s propose an extreme situation: let’s say our final cost is actually $10,000 more than estimated. Your investment is now $27,000. Keep in mind we are using retail pricing for all components.
Dome manufacturers will sell you a 15 meter (50 foot), 3-layer version for a reasonable… $65,000, plus shipping, plus a team to set it up.
That’s almost 2.5 times more than our DIY estimate for a comparable product. Even if you add a third layer to our DIY solution, it remains around twice the price of what a dome manufacturer offers. And this also includes that extra $10,000 we added for fun. But let’s be fair: companies need to make a profit, though it seems quite expensive to purchase one. And you still need a team to install and take off the liner.

