Making doors
There are various types of doors you can make for a geodesic dome. The 2 most popular ways are to make an arch (hoop door) or use a conventional frame with a rectangular door. The choice will depend on the use and budget for your dome.
If you are installing a rectangular door
You may want to use a door you have lying around to make a conventional entrance. You can do this, but in larger dome structures you still require to distribute the load of the dome.
You should still create an arch around the door to which your door frame is attached. Not only to distribute the load of the dome but also because it’s easier to adjust a rectangular door to the arch. You can adjust the arch dimension but you can’t adjust a rectangular door unless you cut it.
 |
 |
| Door directly fastened to the dome | Door fastened to an arch |
Doors for smaller domes
On smaller geodesic domes your circular (hoop) or rectangular door will not be at a 90-degree angle because of the dome’s natural curved shape, unless you are building a very large dome. The traditional way to solve this is to extend struts outwards connecting to a rectangular shape that will be your door frame.


Again, on smaller domes you can simply take out and resize struts without worrying about how it will affect the load distribution, but that’s usually acceptable on structures less than 20 feet (6 meters) in diameter and on material used (EMT conduit, wood struts).
Arch entrances need to be round!
What you need is a round archway, as round as you can make it. The reason is that weight/stress/load from the structure is distributed downwards and outwards so your archway needs to do the same. This is why the attachment points are so important. Each one will spread the load evenly around the arch, down to the ground.
Arch doors
You see this design often on event domes. It looks great and is made to keep the dome’s structural integrity because of its arched shape and multiple attachment points.
 Many choose the 3V frequency because it requires less struts, yet it remains a sturdy design for most, at least up to 20′-30′ in diameter. You could go a little bigger though it would be wise to either use a bigger steel pipe or larger timber (i.e. 2 X 8 instead of 2X6).
Because many 3V geodesic domes are of smaller size, stress and loads are less important. You can be more flexible with the design. But smaller 3V may require you to make the door 3 levels high, more than half the total height.
 4V is a great choice for domes 30 feet in diameter and larger. It is stronger than a 3V without the complexity of the 5V. Its base is flat and the exterior is a more rounded surface.
For this frequency, you will almost end up making the arch two levels high. For example, a 40-foot geodesic dome has the first level around eye level which may not be enough. But if you want to have something high enough for a truck to enter then the second level will do nicely.

A 5V geodesic dome is often the choice for very large diameter domes. Rounder than a 4V but requires about half the number of struts of a 6V (350 vs. 650).
Here the arch door is 2 levels high. This is appropriate for a dome of let’s say 40-60 feet in diameter, but for a larger dome one level high should do.
Step 1: Where to install the arch doorway
An example of where to make a geodesic dome door:

You find this pattern on all geodesic dome frequencies. This is a good reference point for an arch door because its base strut is flat (parallel to the ground), is is usually close to the base of the dome, and multiple struts serve as attachment points.
But you can put your door anywhere else as long as your arch is connected to struts: sometimes it makes no sense to make a door at this position.
Watch the video at the end of this page to view different ways to place a door on a timber dome.
Step 2: you need a circle pattern
The quick and dirty method to measure your arch is to find something that can serve as a circle pattern. If your entrance was to be for example for kids, then a hula hoop would do fine to help measure the entrance. But for other larger domes you need something with rigidity and flexibility.
Try tubing such as PEX, the same outside diameter as your steel tubing: it is thick, costs little and keeps a round shape even when shaped in a large circle.

Step 3: hold down your circle pattern to your dome
Adjust the diameter of your circle so that the PEX is on top of the struts. Use rope, tie wraps or tape to hold the circle in place. Be sure to keep the circular shape of the pattern. On smaller dome this is not as important and you can fudge a little, but it is essential on larger structures for even load distribution. Keep in mind that on the base of the dome, the circle is actually cut off, or not used. For this exercise, do not cut the circle: just bend it 90 degrees for now.
 |
 |
| Put the circle on top of the struts | Next attach Circle to other struts that cross the circle. |
Last is attaching the circle to the base of your dome. this will determine the width of your entrance (where people walk in).

If your base clearance is not wide enough (if you have a deformed circle when trying to adjust entrance width): you’ll need to make a larger circle pattern. Try to match the top of the circle to a vertex point if possible; it avoids unnecessary struts shortening later on.
Step 4: measurements
OK, so now you have a nice circular shape that’s attached to your structure. Now you can start taking measurements.
Note: remember how you had to fold the bottom of the circle pattern to put it flat on the dome surface? Don’t cut it off!
Take the circle pattern off the dome, lay it down on the ground and measure the circumference of the tubing (i.e. its length).
To find the diameter of your arch: diameter = circumference / PI OR diameter / 3.14159)
To find the radius of your arch: radius = diameter / 2
By having the circumference you know the length of steel tubing you need to make the arch. At this point you have various options to curve the pipe. The simplest way is to go to your local machine shop and ask to bend your arch from the same pipe you used to make your dome, giving the shop the circumference and radius of your pipe.
Remember that the bottom part of the arch is not required, so that makes the actual arch circumference a little shorter.
Step 5: Welding attachment plates or not
OK, so you just got your rounded arch back from the machine shop and now you need to attach the arch to your dome. First thing is to put the arch against the structure and calculate where struts and arch meet, shorten and flatten some.
Welding plate connectors: One method of attachment is to weld small metal plates with bolt holes in them to your arch and bolt these plates to your struts. This requires welding skills and to be done on site for a custom fit. This can be more than most DIY people can do.

There is an alternative to welding plates.
Flattening section of the arch: because your pipe is round and hollow, any bolting of it to the frames will squish it. Furthermore, the struts that used to be where your arch will go need to be shortened.
Put the arch back on the dome. wherever arch and struts meet, drill a small hole that goes through both the arch and the strut(s). This will be where you drill a larger hole to insert a bolt.
Once all your attachment points are drilled, remove the arch, drill the correct hole sizes into it, then flatten the pipe 1/2″ to 3/4″ on each side of the hole. This will make a flat area where both arch and struts will be bolted. As for the struts that are shortened, do the same as you did when making the struts (flatten the tip and drill a hole).

If measurements were well taken, bolt holes will align and you will have a structurally sound arch that helps distribute the loads and stress evenly.
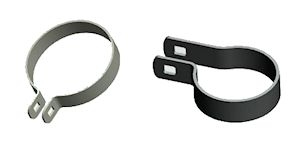
Use clips!: easily available fence clips can be used to hold struts and frame together. You can tighten them with common tools and should be enough for most geodesic dome entrances
Step 6: attaching the dome to the ground
As for any geodesic dome your base should be firmly attached to the ground. This is also true for the door section. Because it is a busy area of the structure where people pass, lean and run into, add extra attachments.