
Geodesic dome cardboard model
This tutorial is possible because of all the hard work by Gabriel who graciously gave us permission to use his Instructable. Putting something like this takes a lot of preparation and effort and we commend him for taking the tinme to help others.
What we need
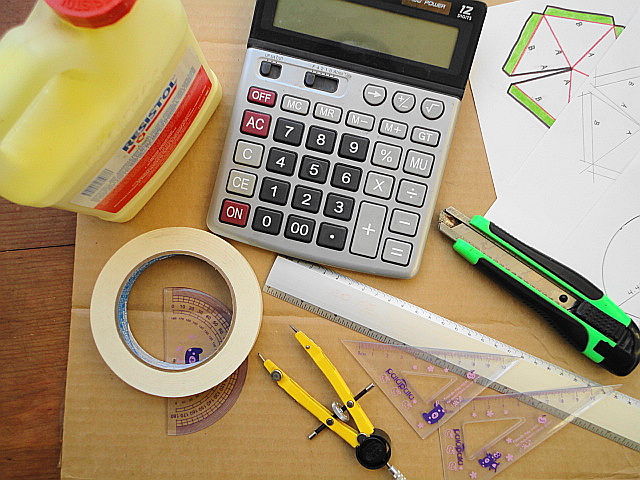
Pen and paper, a calculator, a pencil, some rulers, a compass, a cutter knife, masking tape, glue, single or double wall corrugated cardboard, a work table and “patience”.
Introduction.
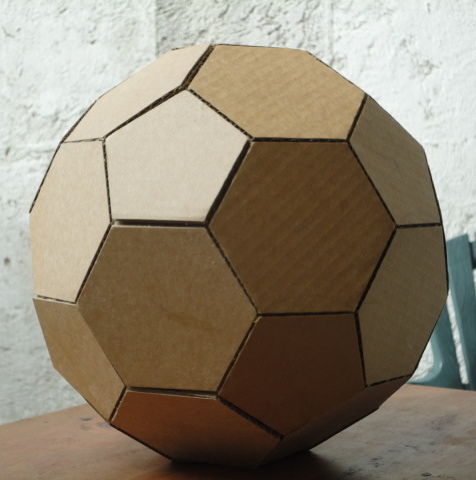
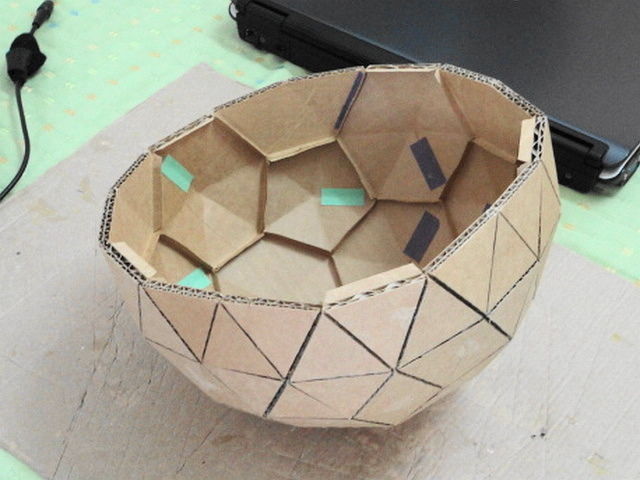
Let say you wanna make a dummy of a dome that’s 40 feet (40′) in diameter and it’s comprised of pentagons and hexagons, sort of like the same general layout in a typical soccer ball. Have a look at the 1st. picture. Although in this case, our soccer ball is cut in half (so to speak). That’s why it’s called a dome. Isn’t it? We don’t have 12 pentagons and 20 hexagons like in a soccer ball, but only 6 pentagons, 10 hexagons and 5 half hexagons.
Step 1:
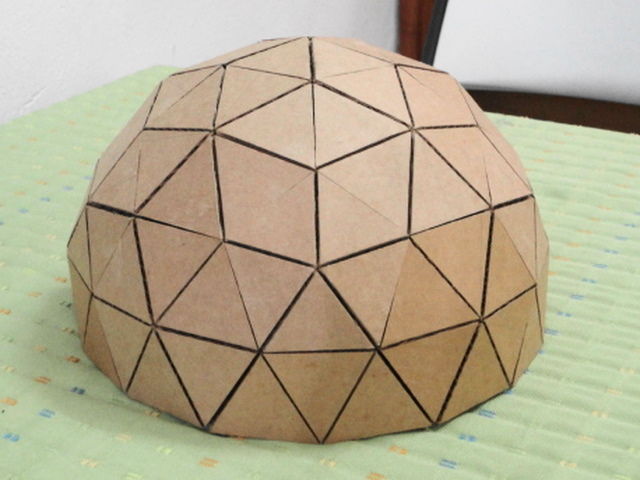
Another difference is that we don’t have just plain polygons. Pentagons and hexagons in our dome, are comprised in turn of a series of triangles; as we can see on our fully assembled dome in the picture.
Step 2: Some technical data and measurements
We have 105 isosceles triangles. Don’t worry, we’re not gonna make as many triangles and try to “patch” them together. That would take forever! So this is what we do:
The scale of our model is 1:48, which means, it’s 48 times smaller than the real building would be. That’s the same as saying that 1 foot (1′) is equivalent to 1/4 of an inch (1/4″). This time we’re gonna use centimeters (cm.) and millimeters (mm.). Since 1″ equals 2.54 cm., a 1/4″ equals 0.635 cm. So to make a long story short, in this project 1′ is the same as 0.635 cm.
If we think of our dome as a structure, each edge (the line where the sides of two triangles meet) is equivalent to or represents a strut. We have in our dome three basic types of struts, A, B and C. Once we do the calculations and know the length of each strut, we’ll be ready to rock & roll!
Step 3:
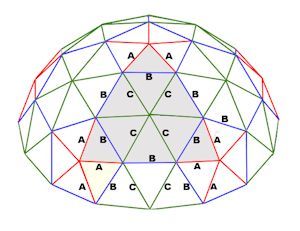
So ‘A’ represents the sides of each triangle in the pentagons. Then ‘C’ equals the sides of the triangles in the hexagons and B is the base of all triangles in both the hexagons and pentagons. Our dome is a 3v frequency dome (don’t linger on this, for now let’s say that’s just the way it’s called) and there’s a “strut factor” for each one of the three types of the aforementioned struts. We can use the same strut factors in any 3v type dome, to calculate their length, regardless of size (how big the dome is). Don’t stress yourself on all this technical data. Start moving along and you’ll get there. You can come back some other day and focus on strut factors, 3v frequency and this and that. For now, let’s build our dummy and have fun.
These are the 3 strut factors: A = 0.34862; B = 0.40355; C = 0.41241. Any strut is equal to the dome radius, times the corresponding strut factor. So to calculate A, we multiply 20′ times 0.34862. So we have 20′ x 0.34862 = 6.98′. Then we multiply 6.98′ times 0.635 cm. which gives us 4.43 cm. So A is 4.43 cm. in length. Follow the same procedure for B and C. Although theoretically and according to strut factors, that’s how you come up with the length for A, B and C. From my experience in drafting these polygons and with the little trigonometry and geometry I know, I realized the real length for B is not 5.12, but 5.02 cm. Which means, “just a hair over 5 cm.” So far you got A and B. Now you only have to calculate C and you’ll be ready to go.
Step 4: How to make the dome

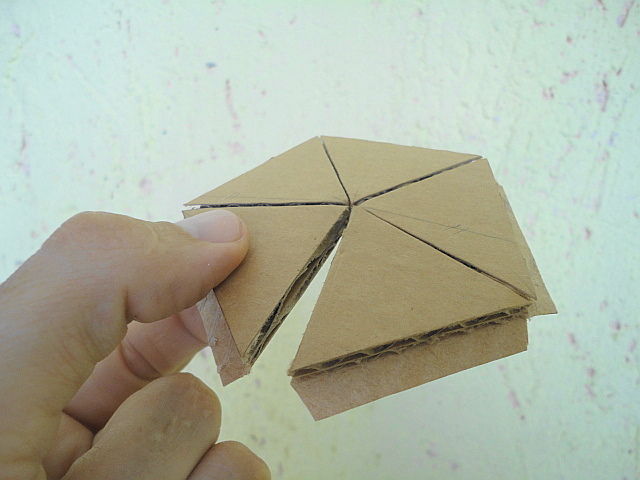
We’re gonna start with the pentagons. With the help of a ruler and the compass, draw a circle with a radius of 4.43 cm. You need to draft these lines directly on the cardboard (On the 1st picture I used black ink, colors and white paper for clarity). Then, draw a straight line from the center of the circle to any point across the circumference. Now open your compass to the length of B and make a marking from our first intersection to any other point on the circumference. See drawing No. 1. Keep going until you have 5 adjacent triangles within the circle. When you’re done drafting your pentagon it’s going to look like drawing No. 2.
We want the cardboard that’s inside the perimeter outlined with black ink. See drawing No. 3. Cut out the rest. Red lines indicate partial cuts. We just need the cardboard on those edges to bend and flex so we can finish off making our pentagon. You can see flaps or tabs (in green) at the base of each triangle. You need those to assemble your dome when you are done making polygons. To produce those, don’t cut all the way through. Leave the thin layer of cardboard on the bottom. When you’re finished making the first pentagon, it will look more or less like the one in the 2nd picture.
Note: I used “double wall corrugated cardboard” because that’s what I had. ‘Single wall’ works as well.
Step 5:
And last but not least, we need to close the gap in-between the two end triangles. Bring them together and secure them in that position with glue and a piece of poster board or the like on the other side. Have a look at the picture to get an idea of what I’m talking about. You can help yourself with a little masking tape to hold the pieces in place while the glue dries up properly. Just make sure you don’t leave the tape too long in there, so you can remove it afterwards without damaging the cardboard. Don’t you want your dome to look good?
With what you’ve learned so far, you can figure out how to make the hexagons and half hexagons. Make all your polygons before you start putting the dome together. On top of the dome we have a pentagon. Use your imagination and the 1st picture as a reference, to figure out the layout of all the pieces in the model.
Step 6: Suggestions and recycling
Be patient, try to be as accurate as you can, be diligent and enjoy the process. Build one section at a time and don’t despair. Use whatever glue works and is best for you. Just give it time to do its job. You don’t want your dummy falling apart. As you go along building up the scale model, you’ll come up with all kinds of interesting shapes and forms. You’re gonna be thrilled.
If you make mistakes, good. If you make more mistakes, even better. If you can’t seem to stop making mistakes, congratulations! “Success is 99% failure”. Preferably, don’t go to the paper shop and buy new cardboard or new boxes. Go talk to the guys at the supermarket or go to a hardware store and ask them when their next re-stock order is due. Tell them to keep some boxes for you. Have a good time and good luck!
Step 7: About this tutorial
This project isn’t about the nifty gritty technicalities of dome geometry or the nooks and crannies of calculating a dome structure. It’s about design, if you like. About experiencing the feel of a geodesic dome as an enclosure as a space. There are many books on domes and dome web-sites and dome companies.

