
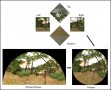
Geodesic Dome projection
 |
 |
 |
 |
|
 |
 |
 |
This page will help explain how to inexpensively project images and video on the surface of your dome.
Projecting imagery inside a geodesic dome has a powerful impact on the senses. There is no limit to what you can project. Event dome manufacturers offer this as a way to liven up geodesic domes. If done well with interesting imagery, the impact is quite breathtaking.
|
Dome projection

|
|
Digital Projection HD full dome.wmv

|
How a dome projection is created
It’s all done with light and mirrors. Whether you use a fisheye lens or spherical mirror process, it is basically the same idea.
In the image below, the spherical mirror is shown. By using one to 4 or more projectors you can cover the entire interior area of the geodesic dome. When using more than one projector you may encounter areas where the projections overlap, or blend. To remedy this situation there are software applications that will “blend” images to correct this effect, resulting in a seamless projection.

Here is a video describing a professional projection setup with 7 projectors using image mapping, a display technique allowing the precise positioning of any section of the projection.
|
Spitball Media Projection Dome

|
Expensive?
It is true that it can be expensive for a professional setup, but that does not mean you cannot do this on a budget. The first expense is the projector. The more powerful it is, the better quality projection you will have. As for ratio, the suggested one is 16:9, though you can also use a traditional 4:3. The 16:9 ratio offers a greater projection area. Note that the size of your dome will determine what projector you will need.
Your standard TV projector does a good job for a projection 30 feet (or 10 meters) away. As you project further with the same projector, the quality and clarity of the projection diminishes. This is one of the reasons event domes have setups with 2,3 or more projectors.
Projectors
There are 2 main characteristics to consider when choosing a projector: resolution and light output (or lumen).
Lumen power output normally varies between 2000 and 8000 (ANSI) lumens. For home use or small rooms, anything up to 5000 lumens is adequate.
Native resolution indicates how many pixels are displayed by default (without digital re-scaling). If your projector has a native resolution of 1024 x 728 pixels, and it also supports 1920 x 1080 resolution, the number of pixels remains 1024 X 728 but can scale the native resolution to 1920 x 1080. In other words, it makes the display bigger but with the same number of pixels.
| Standard resolutions (4:3 aspect ratio) | Widescreen resolutions (16:9 aspect ratio) |
| SVGA: 800 x 600 | 480p: 854 x 480 |
| XGA: 1024 x 768 | 720p (HD): 1280 x 720 |
| SXGA+: 1400 x 1050 | 1080p (Full HD): 1920 x 1080 |
Paul Bourke’s Dome projection on a budget
Probably the best guide to inexpensive geodesic dome projection is Paul Bourke’s Dome projection on a budget, also known as MirrorDome. It outlines how it’s done, what you need and much more.
Equipment: spherical mirror or fisheye lens
There are two basic ways to project imagery onto the interior of a dome: using a fisheye lens or a spherical mirror.
 Projection fisheye lens |
 Mirrordome or spherical dome projection method |
A fisheye lens warps the projection coming out of the projector so that when it hits the screen fabric it looks proportional and undistorted. The lens used are relatively expensive, not easily available, and often need to be custom to the projector.
The inexpensive way to do the same thing is by using a spherical mirror (similar to the ones you see in stores for security purposes. The images are pre-warped, then projected onto the mirror which in turn projects them on the dome surface. The trick here is having processed the images and video with software before being projected. There are various applications used to pre-warp content. You can view the projection software page for more applications for Mac, Windows, Unix.
Comparison between Fisheye and spherical mirror projection methods
|
Fisheye
|
Spherical mirror
|
|
| Cost and availability | Expensive, not always available for all projectors. | A quality spherical mirror for dome projection can easily be found at reasonable cost. Multiple sizes are available. For example a quarter mirror between 9″ and 18″ varies from $125 to $200. They are also available as used. |
| Convenience | There are no actual universal fitting. You often need to find the correct lens to a specific projector. | One is not limited to particular projectors for which fisheye lens can be fitted. Existing projectors can be used or a projector chosen for particular attributes such as brightness, resolution, or contrast. |
| Brightness | Reduced brightness of the projection due to light passing through a fisheye lens. | Because a spherical mirror only reflects off a mirrored surface, it loses little brightness. |
| Projection ease | Usually needs to be set up in the center of the dome, but with very powerful projectors you can position them almost anywhere. | Can be set up at the edges of the geodesic dome, out of the way of the audience and easier to secure from being knocked over or bumped into. |
| Projection coverage | Most fisheye projection solutions project on 3/4 of the dome surface. |
For a full dome coverage, using 2 projectors is the simplest solution. Many configurations are possible, and the optimum one will depend on dome size and the projection coverage area. |
| Scaling | Scaling is done from one projector only. | You can have better scaling, resolution and brightness by using more than one projectot (2 to 4 is common) |
| Chromatic distortion | Image tends to distort at the edges (rim) of the fisheye lens | No chromatic distortion when using a quality mirror. |
Note 1: the projector needs to be positioned close to the spherical mirror so as to project the entire imagery on it while maintaining focused. This means your projector has to be able to focus at a short distance. An alternative is to obtain a larger mirror which lets you position it a little further away from the projector.
Note 2: when looking for a spherical mirror, be aware that the reflective surface is often applied inside the plastic shape; you need to avoid these because the transparent plastic layer will play havoc with light reflection, downgrading significantly light directionality and intensity. Look for mirrors with the reflective coating on the outside. Because outside-layered mirrors are more fragile as camera lens, the cheaper versions found online, on eBay or at used equipment stores are good for testing purposes.
For a more technical explanation of dome projection, click on the images below to view the PDF documents.
 |
 |
Dome projection discussion groups
 |
 |
| A private group for members of the planetarium, computer graphics, and visualization communities interested in fulldome video technology. Discussion topics will be limited to aspects of the domed-theater medium directly related to fulldome imaging, aesthetics, and technology. | A friendly group for folks interested in building and/or operating a planetarium. There are a wide range of possible uses for small planetariums ranging from traditional astronomy education, to some of the new opportunities in wider science education, visualisation, art, and entertainment offered by fulldome digital projection. |
The fabric used for projection

Some blackout fabrics use layers of fiberglass and PVC but are less flexible
You will need a “blackout fabric” on which you will project images and video.
Blackout fabrics are commonly found in hotel rooms as curtain linings or drapery, blocking much of the light that would otherwise enter through a window when the curtains are closed. A blackout fabric has a coating of foam, or passes. There are 2 basic variations:
A 2-pass blackout is produced by applying two passes of foam to a fabric – first, a black layer is applied to the fabric, then a white or light-colored layer is applied on top of the black.
A 3-pass blackout is produced by applying a layer of white foam to the fabric first, then a layer of black foam followed by the third and final layer of white or light-colored foam.
A 3-pass blackout fabric is also decorative. A 2-pass is not really decorative because the foam backing is visible through the fabric side of the material. Naturally if you do projection on a budget you may want to use a fabric with high reflectivity instead (many good alternatives can be found at various fabric stores), but remember this will work only when there is no light from the outside. There more reflective your fabric is, the clearer your images are. Think of it as a flashlight aimed at a wall as opposed to a screen mesh.
Alternative to a standard blackout fabric
Some materials inhibit any light from passing through its layer. This is regularly used by event dome manufacturers for convenience: a first black and opaque cover is installed on the dome, then a second (usually a decorative one) is placed on top of it. Look at the beginning of the video below to see how installation is done.
|
Pacific Domes – 360 digital projection (Audi)

|
Software
This is the good part: many software packages for geodesic dome projection are free, open source or available at low cost. Keep in mind many of the available software applications are for projection of the sky, planets and general planetarium use. Some can be adapted to pre-warp your own images and videos.
Also keep in mind many of these applications may pre-warp before projection though they will not handle video. The best option for on-the-fly dome movie projection is an application for Macs written by Paul Bourke, an authority on the subject. Look for warpplayer for Mac or click here to see a selection available for download.
F.A.Q. (Frequently Asked Questions)
A very well-written FAQ on dome projection can be found here. Again, many thanks to Paul Bourke, the author and expert on the subject.

